Multi-Factor Authentication – Setup and Configure
Multi-Factor Authentication or MFA is an authentication method in which a computer user is granted access only after successfully presenting two or more pieces of evidence to an authentication mechanism. In this case, it is something you know like your password and something you have, a multifactor code.
How it works:
Once enabled Microsoft 365 will now require a second factor for authentication when not on campus. This is a way for us to protect your Microsoft 365 account and prevent unauthorized intrusions. This is only for off campus access; if you are on campus, you will not be prompted for the second factor.
The setup is simple, you configure your options on how you would like to receive your Multi-Factor Authentication. Your options are mobile phone, office phone, text or authenticator app.
The authenticator app can be installed on a smart phone and is highly recommended as it is much easier to just hit approve when signing in. To install the smart phone app, go to your mobile app store and search for “Microsoft Authenticator”. You can find authenticator app directions later in this document.
Configure your MFA notification options
Using the link below you will be asked a set of questions on how you would like to be notified for two-step verification. The setup will guide you through the steps. Please follow the link: https://aka.ms/mfasetup. When clicking the link, you will be taken to an Office365 MFA setup page that looks like this:

First select your preferred option for how you would like to be notified from the drop down. Your options will be:
• Call to Authentication Phone
• Text to Phone
• Call to Office Phone
• Notification through mobile app
• Verification code from mobile app or hardware token

Next, you will be asked to verify your choice.
The screenshot below shows what happens if you chose the authentication phone option. The system calls you to verify. If you choose the app you will need to create the account and respond to any prompts from the app.

Once you have completed the setup you will be taken to an additional security verification page. You are now done, and two-step verification is ready to be enabled for your account.
You may also close the additional security verification page, but you can always come back to this page to change your settings.
Configure Microsoft Authenticator Mobile App
Install the app
The Microsoft Authenticator app is available for Android, iOS, and Windows Phone. To get the best experience, you should let the app get notifications when you're asked.
Add accounts to the app
You can add work, school accounts or personal accounts to the Microsoft Authenticator app.
Add your DMU account
1. Navigate to the https://aka.ms/mfasetup page. You may likely still be on this page from your initial setup.
2. Check the box next to Authenticator app, and then select Configure.

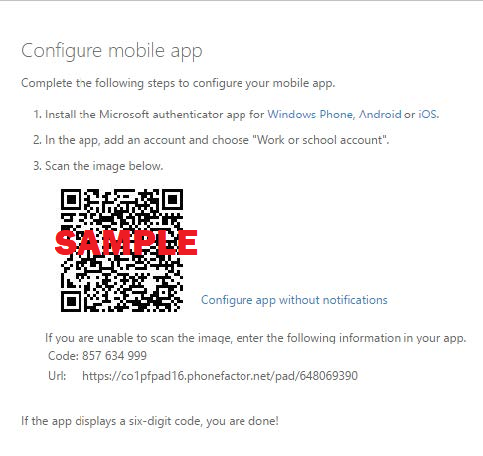
The Configure mobile app screen appears with a QR code for you to scan with the Authenticator app.
3. Open the Microsoft Authenticator app. On the Accounts screen, select Add account, and then select Work or school account.
4. Use your device's camera to scan the QR code, and then select Done to close the QR code screen.

The Accounts screen of the app shows you your account name and a six-digit verification code. For additional security, the verification code changes every 30 seconds preventing you from using the same code twice.
Once completed the Authenticator app is linked to your Microsoft 365 account.