MacOS - MS Advanced Threat Protection Install
This document will walk you through the install/setup of the Microsoft Advanced Threat Protection software. ATP is replacing the BitDefender antivirus software you may currently have installed on your Mac.
If you still have BitDefender installed on your computer, we will need to remove that first. If not, proceed to Section II (Install ATP).
I - Uninstall BitDefender (DMU issued Macbooks)
-
Open Applications folder:
- Go > Applications
- Open BitDefender Folder
- Double-click EndpointSecurityforMacUninstaller
- When prompted click Uninstall
- When finished click Close
- Restart the computer
II - Download Needed Files
- Download each of the files listed below and Save them to your Desktop.
III - Install MS ATP
- Double-click the wdav.pkg file
- Continue through the installer.
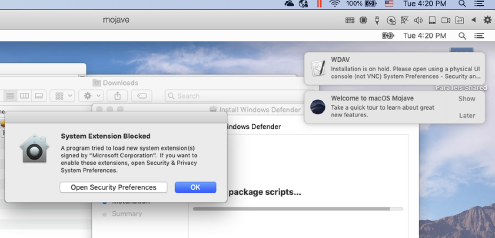
- You will be prompted to allow a driver from Microsoft to be installed (either "System Exception Blocked" or "Installation is on hold" or both.)
The driver must be allowed to be installed. If you don’t see this, skip to step 7.

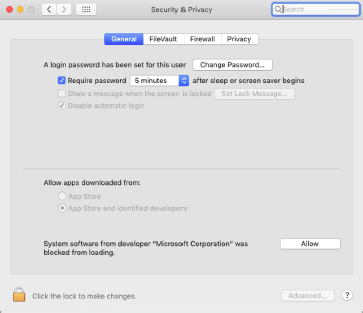
- Select Open Security Preferences or Open System Preferences > Security & Privacy.
- Select Allow

Installation will proceed on its own.
- When completed you may see prompts about updates. Allow it to check for updates and install, this may go through multiple updates and take 10 to 15 minutes to complete. However you can use your computer while this works in the background

IV. Configure ATP
- Ensure the DMU.py file is downloaded and on your Desktop
- Open Terminal
- Type the following python ./desktop/dmu.py and press Enter
- Enter your Password when prompted and press Enter

- Reboot you computer
- Delete the files you downloaded
Microsoft Defender ATP should now be on your top Menu Bar