CoursEval Admin Guide for CHS
This article is specific to the College of Health Sciences implementation of CoursEval. These items need to be completed at the beginning of or prior to each term after all courses have been set up in Colleague and students have been enrolled.
Checklist
Course Setup
- Verify course details and Responsible Faculty (Course Director or Co-Directors) in CoursEval
- Add instructors as Participating Faculty
- Add CoursEval to D2L courses
Survey Administrations
- Create survey administrations
- Select courses to associate with survey administrations
- Sync student enrollment shortly before evaluations open
Step-by-Step Instructions
Verify Courses and Add Instructors
- Click Setup and select Courses.
- Ensure all the filters at the top of the page are set to Show All. Or you can filter by Period to narrow the list.

- Verify the details for all courses in your roster. Any changes to course information (with the exception of Participating Faculty) need to be made in Colleague.
- Note: All DMU courses and sections--not just CHS--have been imported into CoursEval. Pay attention to section number and period so you edit the correct course and don't make extra work for yourself.
- Look at the Responsible Faculty listed for each course to verify it's correct. Any changes to Responsible Faculty (Course Directors or Co-Directors) need to be made in Colleague.
- For each course that has instructors to be evaluated, click the icon in the Manage Faculty column next to that course.

- Click the Edit List button under the Participating Faculty 3+ Lectures header.

- Enter last name of instructors to be evaluated (course directors included) in large text entry box under Enter Search Values. If the course has multiple instructors, you can enter multiple last names at once, each on a separate line. Then click Search.
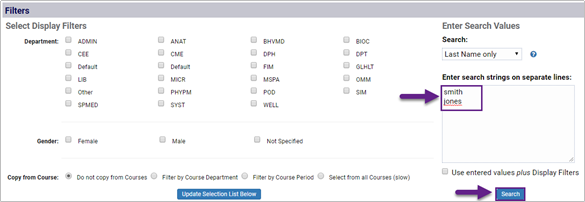
- All matching instructors will appear in the search results below with all matches automatically selected. Uncheck the boxes as needed so that only the instructors to be evaluated for the current course are selected, and then click Save when you're done.

- Repeat steps 5-8 until all instructors to be evaluated have been added.
Create and Set Up Survey Administrations
Assumptions and Definitions
-
Survey Administration - the container that holds all the course surveys for a given program and a given term.
Example: 21/FA2 Course Feedback PA
-
Auto-Open date/time - when a survey administration will automatically open. Auto-Open date/time must be prior to any individual course survey opening.
-
Auto-Close date/time - when a survey administration will automatically close. Auto-Close date/time must be after all individual course surveys close.
Note: These may be different than the Start date/time and End date/time for individual course surveys that are using custom start and end dates.
Create New Survey Administration
- Click Survey and select Survey Administrations.
- Click New Standard Survey Administration.
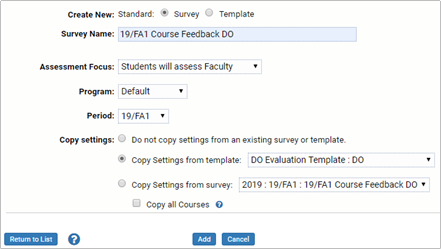
- Ensure the Survey option is selected next to Create New: Standard:
- Enter a name for the survey. Recommended: [Term] Course Feedback [Program]
Example: 21/FA2 Course Feedback PA
- Set Assessment Focus to Students will assess Faculty.
- Set Program to Default.
- Select the appropriate Period.
Note: Each Period requires a separate survey administration.
- For Copy settings, select the option to Copy Settings from template and select the template named for the program you're creating evaluations for.
- Then click Add when you're finished.
Set Auto-Open and Auto-Close Dates
- Return to Survey Administration under the Survey menu.
- Click on the name of the survey you just created.
- Note: If you don't see it, make sure the filters for Year, Period, Status, and Program are set to Show All.
- For Published Deadline, check the box for Synchronize with auto-close date (and don't worry about adjusting the Published Deadline date).
- Enter a date and time for both Auto-Open date/time and Auto-Close date/time.
- Note: The Auto-Open date/time must be earlier than the earliest included course evaluation open date, and the Auto-Close date/time must be later than the latest included course evaluation close date.
- Then click Save.

Select Courses
- In the row for the new survey administration you just created, click the icon under Select Courses.
- Note: If you don't see it, make sure the filters for Year, Period, Status, and Program are set to Show All.

- Scroll past the filters, ensuring all of them are blank, and click Apply Data Filters.
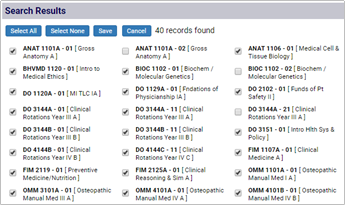
- You'll see a list of all courses that match the term you selected for the survey administration. Check the box next to each course you want to include in this survey administration.
- Note: All DMU courses and sections--not just CHS--have been imported into CoursEval. Pay attention to section number so you add the correct section.
- Click Save after you have selected all the desired courses, and then click Return to List to continue with the next step.
Preview Surveys
- Begin by selecting Survey Administration from the Survey menu.
- In the row for the desired survey administration, click the icon under Detailed Settings.

- For each course, click the icon under Preview Survey and make sure the survey questions match what you're expecting.
- Note: You do not need to answer any of the questions. Just click Save and Continue (at the bottom) or Previous Page (at the top) to navigate through the survey questions.
- If anything looks wrong with a survey preview, please click here to submit a CoursEval request.

- Close the survey preview when you're done and repeat step 3 to preview the remaining surveys included in the survey administration.
Sync Student EnrollmentShortly before each survey administration is scheduled to open, you'll need to manually sync student enrollment to ensure the evaluations are including the most up-to-date student enrollment data.
- From the CoursEval admin/manager portal, go to Survey > Survey Administrations.
- Select Detailed Settings for one of your upcoming survey administrations.
- At the top, select Action > Sync Participants.

- You'll see a pop-up letting you know what changes were made. Click OK when you're done reviewing the changes.
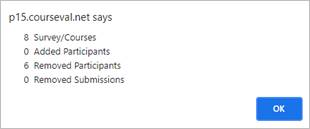
- Repeat these steps for all your upcoming survey administrations, or you may instead choose to follow the steps at a later date for survey administrations that open later.
Add CoursEval to D2L Courses
- Open Desire2Learn (D2L) and navigate to the desired course.
- Select Content from the course Navbar at the top of the page.
- From any module (you may want to create a separate module just for CoursEval), select Existing Activities and then select External Learning Tools.
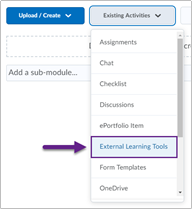
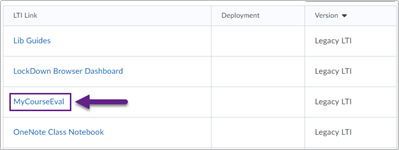
- Select MyCoursEval and you should see it appear in the module.
