Des Moines Campus Print Overview
This article is an overview of the printing services on the Des Moines Campus Printers.
Global / Find-Me-Print
DMU offers a global "find-me-print" queue for both the DM and WDM campuses. The queue for the Des Moines Campus Is
- Staff_Printers_Xerox (DM Campus)
Find-Me-Print queues utilize Papercut print management with Xerox Altalink and Versalink devices which are located in general areas around both campuses. Print your document to either of the global print queues and it will be available to release at any connected printer. Swipe your badge or enter your DMU username and password, and you can release them using the Papercut menu.
Important Info:
- The print queues for DM and WDM campus are separate. You cannot print to the DM campus print queue and release it from the WDM campus print queue, and vice versa.
-
Students will need to add money to their Papercut account in order to print or make copies. You can find help for that here: https://dmu.freshservice.com/a/solutions/articles/14000044107
Finishing options: (see Print Preferences Below)
All Altalink printers will have special "finishing" features:
- Stapling
- 2/3 Hole Punch
- Collate
Versalink Printers do not have finishing options.
Direct Print Queues
There are also a number of individual print queues for select printers around campus. These printers have special functions/uses or are in isolated areas. These printers may be restricted to specific users/groups.
Installation:
Follow the instructions linked below to walk you through installing the printers on either a DMU issued/managed computer or a Personal computer.
Color Printing
All print jobs to the global queues will be B/W unless you choose to print Color in the Printer Preferences on your computer. (see Print Preferences Below)
Print Preferences
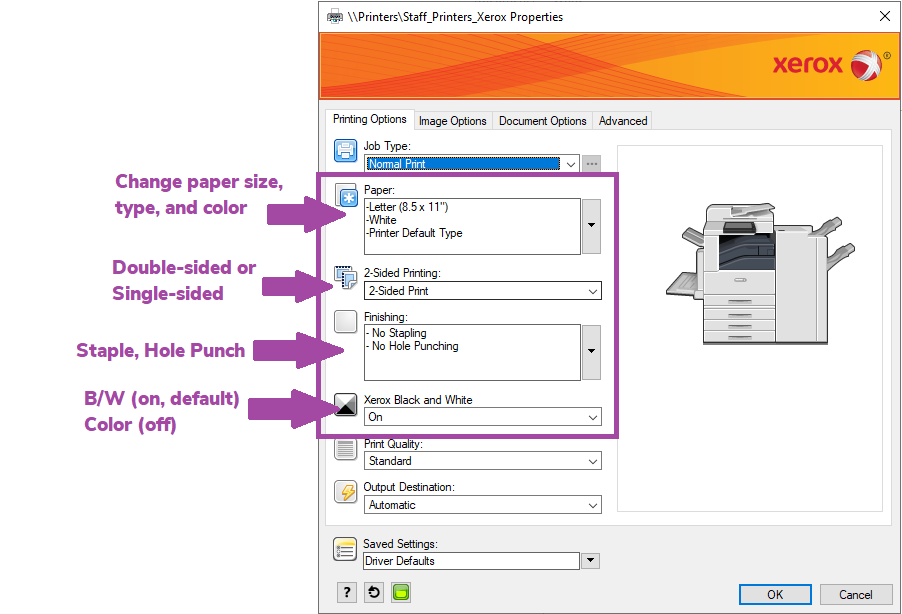
Options for finishing or printing in color can be done through the Xerox Printer Preferences.
Printer Defaults
- Black and White
- Duplex (double-sided)
- Plain, Letter, White
You can adjust the settings by clicking on Print Properties/Preferences.
Press OK when done to confirm the settings.
